New Blog location

With the introduction of our new website (March 2021), we incorporated the blog into the website, in order to improve the overall users’ experience. We moved the latest posts to the new blog and will leave this blog as an archive. This will be our last post on this blog. All the new stuff can be viewed at https://www.coolorange.com/blog. We welcome you to the new blog.

Posted in Uncategorized | Comments Off on New Blog location

Welcome the new powerFLC

We are super excited to finally release the brand-new version of powerFLC, which connects Vault with Fusion Lifecycle in a modern and flexible way and to supports any imaginable workflow.

This was a long journey. Back in 2014, we wrote the first blog post about this topic. Back then Fusion Lifecycle was called PLM360, and our intention was to create a PowerShell extension for the Fusion Lifecycle API to so easily connect Vault to FLC in a flexible and simple way. Unfortunately, PLM360 moved in other directions for a while, and in 2018 Fusion Lifecycle and Vault fell in love again and so we thought now the time is right.

To capture the moment, we developed vaultFLC, a super simple, ready-to-use, not customizable connector that allowed to connect Vault to FLC in 4 predefined workflows in less than 10 minutes. vaultFLC had been officially released and introduced at the Autodesk OTx conference in Barcelona last April.

We knew that, while the 4 delivered workflows addressed the right topics, the lack of customizability would be a problem. Let’s face it – it’s all about connecting processes and processes are individual, one way or the other. So, we used the time to learn from customer projects and went back to the original plan to create a PowerShell version of the connector that can be adapted to any need. The first version of powerFLC was available with the release of our V21 products this April of this year but without preconfigured workflows. It was an insider version for people who know how to write scripts.

With this new version of powerFLC, we finally completed our mission. powerFLC has now a ready-to-use workflow that was designed and implemented together with the Autodesk team. It intelligently links the Vault item Bill of Material to Fusion Lifecycle. The new configuration dialog box allows flexible property mapping and flexible job settings. In addition to the workflow settings, it is now possible to optimize and improve the workflow as needed through scripting.

Other workflows are in preparation, such as linking change requests between Vault and FLC, publishing files, and more. We will make such workflows available as templates through our GitHub site, and once we have gathered enough project feedback, we will add them to the product.

powerFLC runs on powerJobs. This means that tweaking existing workflows or creating new workflows is as simple as creating a new powerJobs job. The simple PowerShel cmd-lets allow you to create any sort of workflow, and in combination with the powerJobs and powerVault cmd-lets, connecting Vault with FLC becomes easy and fun.

There is one more thing: powerFLC also runs on the Vault client. It works with powerEvents and Vault Data Standard (VDS). So it is now possible to create workflows that require user interaction (through VDS) or are time-critical (through powerEvents). Imagine releasing an assembly in Vault and using powerEvents and powerFLC to perform checks against FLC and prevent non-conforming parts from being released. Or you create something in Vault, like a new project with VDS and powerFLC, and collect or send data from/to FLC. In addition to the workflow automation made possible by the Job Processor and powerFLC, we can see a variety of scenarios with user interaction and compliance checks on the Vault Client that will wire even more Vault and FLC as a seamless platform.

We are excited about all the cool projects that will be done with powerFLC. We look forward to working with you and hearing from you.

Posted in Fusion Lifecycle, powerFLC, powerJobs | Comments Off on Welcome the new powerFLC

V21 versions ready

Ready for Vault 20201? We are! The new coolOrange products, supporting Vault 2021, 2020 and 2019, are now ready for download from http://download.coolorange.com. The products retain the usual compatibility to previous versions, which makes upgrading fast, easy and secure. The version #21 contains all the enhancements made over the past year and you can find details for each product on the wiki in the given changelog section.

One important change is the removal of splash screens. Yep, no more self-promotion :-). 10 years ago, as we started with product development, the splash-screen seemed cool. Meanwhile they are bothering our self. There was some useful information on the splash screens, such as the license expiration period, access to wiki pages and the like. We switched to a more modern way, which is the Windows notification center. So, when our products are started or loaded, a windows notification is shown with information about the license expiration.

Each product has now an entry in the Windows menu with link to the wiki, about, license and logs. So, it’s all still there, but in a way cleaner way.

With the release of powerVault, powerJobs, powerEvents and powerGate, we are proudly adding a new power-tool called powerFLC. powerFLC connects Vault to Fusion Lifecycle in the typical coolOrange style. Simple to install, ready to use, and with a lot of flexibility under the hood, in order to address any sort of thinkable custom workflow. We will talk more about powerFLC in the next weeks.

The load tools such as dataLoader, vaultRuler and the bcpToolkit are on the way, but need some more weeks for the final release.

We are excited to see which customers’ requirements will successfully be implemented with the new product line.

Posted in Uncategorized | Comments Off on V21 versions ready

Spring cleaning

With the launch of the #21 product release, which will happen next week, we cleaned up the product line and had some rebranding.

The probably world’s best-selling Vault Job Processor add-on, powerJobs has enabled so many customers to automate tasks such as PDF publishing, DXF creation, email notification, printing and more. Its simplicity and flexibility allow you to create any type of job with minimal scripting knowledge. There is a question that new customers ask almost every time: “I have x Vault seats, how many powerJobs do I need?”.  The answer is: “one powerJob per Vault Job Processor!”. We have decided to rename powerJobs to powerJobs Processor to make it easier to associate it with the Vault Job Processor. There is another reason why we did this, namely, to rename jobWatcher to powerJobs Client. powerJobs Client is the perfect companion to powerJobs Processor. It informs the user when a job is in the queue (sensibilization) and, more importantly, it informs the user when his job encounters a problem. This ensures that workflows are not interrupted. Renaming it to powerJobs Client makes it easier to understand that powerJobs Processor and powerJobs Client simply belong together.

Last year, we introduced a new product called vaultFLC that easily connects Vault to Fusion Lifecycle (FLC). It requires little configuration and is ready to use in minutes. This has changed the landscape of how Vault connects to the Fusion Lifecycle. Next week we will release the next generation of the vaultFLC connector, which still retains the same simplicity but uses the flexibility of PowerShell to configure and customize existing workflows and create additional custom workflows. That’s why we’ve decided to rename vaultFLC to powerFLC. powerFLC is consistent with the other powerXXX products, completing the product line to enhance your Vault environment and connect it to the rest of your organization. There will be a powerFLC Processor running on the Vault Job Processor and the powerFLC Client to connect Vault-client-side workflows to Fusion Lifecycle.

Posted in Fusion Lifecycle, powerJobs | Comments Off on Spring cleaning

Items, or not items, that’s the question

Over the past 5 years, we had the pleasure to connect Vault with over 20 different ERP systems, through our solution powerGate. From SAP to Microsoft and many, many other ERP vendors. In the conversation with customers, one question came up every time: shall we use Vault items or not. There are good reasons to use the Vault item master and there are good reasons not to use it.

Let’s see what it means not using Vault items. In this case, you may use Vault Professional and just ignore or even switch off the item master, or you may use Vault Workgroup. In both cases, the only source for the Bill Of Material (BOM) is your CAD data. Luckily, when you check in an Inventor, AutoCAD Mechanical or Electrical file in Vault, the CAD BOM is stored as well. The “assign item” function of Vault Professional uses exactly this information for generating items and the BOM. The same data can be used to transfer the CAD BOM to the ERP system. So, without the need to open the file, the CAD BOM is ready for use. This means that if the CAD BOM stored in Vault is complete, then it can be transferred 1 to 1 to the ERP system. In other words, if your BOM within the CAD application is complete, it can be used as the source for creating the BOM inside the ERP system, without using Vault items. The resulting ERP BOM is identical to the CAD BOM, in content and structure.

There are two topics that may cause a bit of struggle: purchase parts and raw materials. For the purchase parts, you can use Inventor’s Virtual Components. For the raw material, Inventor does not provide any solution. However, in our projects, we apply a workaround. With powerGate you have an ERP item search within the CAD application, which allows you to search for a purchase part and insert that as a Virtual Component. The same search can also be used to search for raw materials and save the raw material number and quantity as a custom iProperty on the part. Such information is later used when transferring the CAD BOM to the ERP system. By completing the CAD BOM with Virtual Components and Raw Material, such BOM can be transferred to the ERP system.

So, why using Vault items? One reason is obviously the case where you cannot create a complete CAD BOM, either because of complexity, time, effort or any other reason. In such a case, using Vault Professional, assigning items and completing manually the BOM with Vault items, is the only way to transfer a complete BOM to the ERP System. But there are also some other benefits by using the Vault items. For instance, if your ERP system does not track BOM history, the Vault item master is the solution. Or in case you have BOM row properties, such as length, size, surface treatment or the like. Properties that are specific to the instance of the given item in the given BOM. Inventor does not provide a way to manage such information, but the Vault item master does. A workaround is applicable here as well, such as storing the BOM row values as custom iPropeties at the Inventor assembly level and then reuse such information during the BOM transfer. Another benefit of the Vault item master is the workflow. You can release item BOMs separately from the CAD files, and so apply a level of control to the BOM transfer. A CAD change may not imply a BOM change and therefore a new BOM transfer. By separating the CAD files from the item BOMs, you add additional workflow steps, but also an additional layer of process control.

What we have seen so far is that if there is a trend in creating a complete digital model, including purchase parts and raw material. If that is your case, then using the Vault item master for connecting to the ERP system may feel like an additional effort without any value. If that is the case, then fine, go ahead and either use Vault Workgroup or Professional without items and connect your Vault to the ERP system directly through the CAD BOM. Otherwise, leverage the functionality that Vault Professional delivers to you and connect the Vault items to the ERP system.

Which way you choose is up to you, the important thing is to stop transferring BOMs manually to ERP and invest in an ERP integration. It’s worth every penny!


Posted in Vault-ERP connection | Comments Off on Items, or not items, that’s the question

10x Happy New Year

1x Happy New Year

Yes, it’s the 10th time that we have the pleasure to thank you for the fantastic year and to wish you all the best for the next. Founded in 2009, we’ve come a long way and celebrate the 10th birthday. Our intention was (and still is) to make Autodesk Data Management successful, worldwide. Coming from a software development background, with many years of experience in collaborating with resellers in Data Management projects, we saw the potential of Vault and wanted to unleash it with customers around the globe.

We believe that Data Management requires to be configured and customized to meet the customers’ processes. Vault comes with best in class, preconfigured CAD workflows so that starting with Vault in the engineering department is a no-brainer. The configuration of Vault is simple and flexible. However, when it comes to customization, meaning extending or automating the built-in workflows, the classic application engineers are confronted with the .Net development language. Although most application engineers have some coding skills, such as with scripting languages like Lisp, iLogic or even some Visual Basic (or VBA), creating extensions for Vault requires deeper development knowledge. This is where we saw a chance to help. We started by choosing a (back then) new and quite promising scripting language from Microsoft called PowerShell and created several Vault extensions that used that scripting language for customization. The idea was to put application engineers again into the game of customizations with a simple, powerful and standard scripting language.

In 2010 we released the first version of powerJobs, which uses PowerShell for creating any sort of imaginable custom jobs. From simple PDF generation into a shared network folder, up to connecting to SharePoint or the like. Meanwhile, PowerShell is ubiquitous inside the Microsoft landscape, so that any workflows can be implemented, and the web is full of tutorials and code snippets.

We immediately recognized that although PowerShell is way simpler for non-developers, the Vault API was still too complex. Therefore, we developed powerVault, which exposes the most used Vault API functions in a way simpler and version-independent way. This really changed the game. Now every application engineer can create custom jobs, and the best is that such jobs are compatible across Vault versions.

In 2012 it was time for myView, today known as Vault Data Standard. The idea was to provide a simpler way to customize the Vault client, with additional dialogs and functions. With simple PowerShell scripts and XML files, it became possible to tailor the way designers enter their data into Vault by following the company’s standards. Data Standard got acquired by Autodesk a few years later and it’s now part of the Vault client.

In 2014 we introduced a new way to integrate Vault with ERP systems. So far, the classic way was to exchange text files between Vault and the ERP system, but we thought there must be a better, more efficient and more modern way of doing this. We looked to several solutions on the market, but they were all too complex, cumbersome and expensive. We wanted something deeply integrated into the CAD workflows. powerGate was born, and it brought ERP integrations to a completely new level. Due to a direct integration with the ERP system, the next item number can be pulled from the ERP system, the Vault BOM can be compared with the ERP BOM, ERP items can be searched and inserted as virtual components or raw material, and any operation is immediate, so no delay and no deferred error handling.

In 2016 we wanted to make Vault actions (events), such as check-in/-out, lifecycle change, and the like, extendable through PowerShell. powerEvents was the answer. With simple PowerShell scripts, it’s now possible to limit or extend the execution of a Vault client action, such as a lifecycle transition, by creating a custom logic. Examples are preventing the designer to approve his own file (4-eye check), or automate the assignment of items, and much more. Companies’ rules can now be easily applied to the Vault client.

In 2018 it was time for connecting Vault to Fusion Lifecycle. We always believed in having heavy CAD files well managed locally by Vault and have companywide processes managed by a connected PLM system in the cloud. We, therefore, created the Vault flcConnector, which comes with simple and configurable workflows, so that within a few minutes, your Vault is connected to Fusion Lifecycle and you can start working. The flcConnector already became the first choice for connecting Vault to Fusion Lifecycle.

In the 10 years, we started by creating applications that make the enhancements of Vault processes simples, continued with connecting Vault to ERP and PLM, and with the introduction of the bcpToolkit, we changed the way how big Vault data load shall be done. Our work can be summarized in

This is where we put our attention. Make complex data load from file-system or competitive solutions into Vault a secure project. Ensure that Vault processes get enhanced to meet the companies’ standards. Connect the engineering department with the rest of the company in a modern way.

So, the question is, what’s next? Well, the Vault–Fusion Lifecycle connection just got started, and we are working on the next evolution of our connector so that any workflow can be implemented simply. You guess it? Yes, there will be a PowerShell version of the connector soon, which will put you all in the position to create cool workflows.

We are commitment to LOAD – ENHANCE – CONNECT and have several topics we are working on, and we will be pleased to continue to share our work with you. As for now, we like to wish you all the best and look forward to working with you in the new year.


Posted in Uncategorized | Leave a comment

Release #20 ready for download

It is done! The ’20 release of the coolOrange products is finally ready for download. Like the previous releases, this version supports Autodesk products in version 2020, 2019, 2018. So, both new and existing customers can move to the latest version of coolOrange products. The new version contains all the enhancements which have been done over the past year, and also introduces a brand-new licensing engine.

Why a new licensing engine? Autodesk offers a token flex license model and customers who use this model, require from us a license model that supports the Autodesk’s token model. So, the new licensing engine supports a token-based licensing model. We will provide more details about this very soon. What is important for now, is that the new licensing engine support network activation, so you can activate all your coolOrange clients via network. More details can be found on our wiki in the licensing section.

Brand new is also the jobWatcher, which is an extension for the Vault client and informs users when a job is queued, and when one of their jobs runs into an error. This is very helpful for those customers who rely on jobs and want to be informed in case of issues.

Brand new is also the Vault Fusion Lifecycle Connector, which, as the name says, connects your Vault with Fusion Lifecycle. This connector works out of the box and provides 3 scenarios, which are very simple to configure. With this connector, you can sync your projects, items, BOMs and manage change orders. We will talk more about this in the next weeks.

All the products can be downloaded from http://download.coolorange.com, except for the bcpToolkit, which will be released in the upcoming weeks and will support the Vault 2020 BCP format.

As usual, the new versions are compatible with the previous versions, which makes upgrading very easy. In case you need assistance, feel free to reach out to our support at http://support.coolorange.com.


Posted in Uncategorized | Leave a comment

Analysing the PSP database for migration to Vault

There are still a lot of Autodesk Productstream Professional (PSP) environments that need to be migrated to Autodesk Vault. For analyzing the quality of the files, the Autodesk Data Export Utility (DEX) is covering a lot of topics, like identifying unmanaged files or missing references for Inventor files.
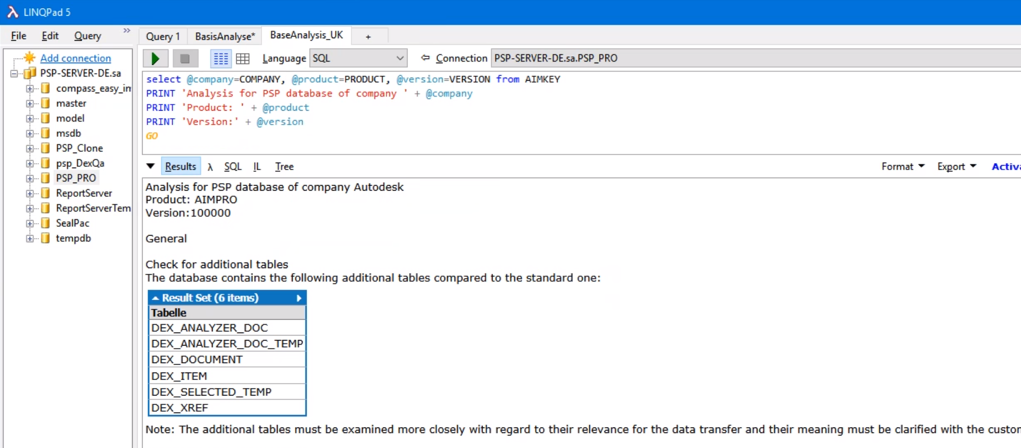
But how to analyze the quantity and quality of the meta-data? In our projects, we are often asked to give an estimate what the effort is to migrate from PSP to Vault, and the information that we get is just the number of files and size of the file store. This determines the duration of the import, but not the effort to prepare the import. Therefore, we have created SQL- and C#-scripts to get an overview of the used data and to identify database customizations. These scripts can be run with a free tool called LINQPad.
There is a SQL script BasisAnalyse.linq that analyses the PSP database and shows e.g. additional tables, element types, relationship types and whether replication or characteristics are used. This is important as the DEX is only covering the standard of PSP and there might be additional effort to cover these objects. The script gives also an overview of how often entity types, document types, usernames, status keys, and fields are used. This helps to identify which objects have really been used and make sense to transfer them.
The script DocumentRevisionCheck.linq identifies documents that could not be imported as they will have a date conflict when the import is done, as Vault is very restrictive in that point. The script ItemRevisionCheck.linq does the same for items. So, these conflicts can be identified at the beginning of the project and not in the late stage, when the first test import already has been made.
With LINQPad it is easy to export the analysis result in a Word or Excel file. These reports then can be discussed with the customer. They are a good basis for defining the scope of the transfer and therefore to estimate the effort. The scripts are for free and can be enhanced by you to your needs. But of course, coolOrange cannot give any warranty for these scripts and you use them with your own responsibility.
The scripts can be downloaded from the coolOrange Labs page https://github.com/coolOrangeLabs/PSP-LINQPad-Scripts. There you will also find further instructions.

good luck with your PSP to Vault migrations

Posted in Migration | Leave a comment

Beta ’20 ready! What’s next?


Last week we published the beta versions of our products for Vault 2020. If you are a “new stuff junky” like us, then go on http://download.coolorange.com and download powerVault, powerJobs, powerEvents, powerGate, dataLoader, vaultRuler and jobWatcher. We look forward to your feedback, which you can post on our support forum, either in the category “product support” for any issue, or “feature request” you have further needs.

Brand new is the introduction of jobWatcher. It’s a Vault client extension, which notifies users when a job gets into the queue and in case the job runs into an error. For those who queue jobs silently (for instance on lifecycle transition) and the job is part of a process, being notified when a job fails is quite helpful. Let’s face it, users (and admins) don’t look into the job-queue to see if their jobs run into an error. So, being notified in case of error helps taking action right away. jobWatcher requires Windows 10, as it uses the Windows notification center for sending the notifications. Have a look and let us know what you think!!!

As usual, the new releases run with the latest version of Autodesk products, and also 2 versions back. So, the ’20 version will run with Vault 2020, 2019, 2018 officially. As of now it also run with Vault 2017, although this version will run out of support in April, as soon Autodesk officially releases the 2020 versions. This way, if you are still on an older version of Vault, you can still use the latest version of our product, which includes all enhancements and fixes.

We want your feedback: the products have the same feature as the latest previous release, except that they are running with Vault 2020. On our forum Feature Requests, we have posted all the feature requests that we received over time through our support, and now we need your voice for prioritizing those. Take a few minutes, go on the Feature Requests forum, and like the ideas that you find most relevant. Under each post, you’ll find the “do you like this idea?” link, which adds your like. You see this only as registered user, which is free. We want to enhance the products with the features you need most, so use your voice to tell us what you need. We will implement the most wanted features over time and may get in touch with you for asking about more details. So, take the chance to drive the direction of our/your products.

Posted in powerEvents, powerJobs, powerVault, Vault-ERP connection | Leave a comment

Publish PDFs to Fusion Lifecycle

Few weeks ago, we published an article about using powerGate to connect Vault to Fusion Lifecycle. It looks like we hit an interesting topic, so today I’d like to show you how to publish your Vault CAD files to Fusion Lifecycle as PDF files. For this purpose, we will use powerJobs and powerGate.

This short animation shows you how this works. You’ll see the drawing gets released in Vault, the Job Processor with powerJobs picks up the task and finally, we see in Fusion Lifecycle, that a new item has been created with the part number and title of our drawing and the PDF of the drawing have been attached to the Fusion Lifecycle item.

In order to get this done, we need two things: a powerGate plugin for Fusion Lifecycle, and a job for powerJobs. At the end of this article, you will find the links to both.

We worked on the Fusion Lifecycle plugin for powerGate and implemented support for the V3 API. We also introduced the 3-legged Forge authentication, so that you don’t have to save your username and password in the powerJobs script anymore. Instead, we have a little login window, which has to be started one time on the machine where you have powerGate Server running. The dialog will ask you to login with your Autodesk ID and then to provide access to the “powerGate FLC” app. Doing so, powerGate can now talk on your behalf with Fusion Lifecycle. By connecting, we received a so-called refresh token, which helps for reconnect on restart. The token has a lifespan for 14 days and refreshed on each use. This way, you just have to authorizes powerGate server once, and he handles the reconnect.

The job is pretty simple. It’s the standard PDF job, except that it creates a Fusion Lifecycle item and then uploads the PDF to such item. You just have to provide a workspace ID (at the top of the script) in which the item shall be created. In order to execute the job, just add a custom job typeto your preferred lifecycle transition. Next time you change the state, the job will be queued, and you will find the PDF in Fusion Lifecycle – that simple!

If you like to try this out yourself, you need powerGate server and client, powerJobs, and the powerGate Server plugin for Fusion Lifecycle.

  1. Install the powerGate Server plugin: The plugin it’s a ZIP file, and the content shall be copied into the powerGate Server plugin folder under C:\ProgramData\coolOrange\powerGateServer\Plugins. So, you will have then a folder called C:\ProgramData\coolOrange\powerGateServer\Plugins\FusionLifecycle which contains several DLLs and other stuff.
  2. Login to Forge: Before you start the powerGate server, you need to grant permission to powerGate to connect on your behalf to Fusion Lifecycle. In the plugin folder, you’ll find a sub folder called Login Manager (C:\ProgramData\coolOrange\powerGateServer\Plugins\FusionLifecycle\LoginManager). Start the ForgeLoginManager.exe and follow the instructions. This is how it could look like:
  3. ReStart powerGate Server: Once this operation is completed, you can start/restart the powerGate Server. You should find an icon in your tray (right click, stop, start) or look for the powerGate System trayin your start menu.
  4. Install the powerJobs job: take the Job from the GitHub page and save it to the powerJobs Jobs folder C:\ProgramData\coolOrange\powerJobs\Jobs.
  5. Configure the job on your preferred lifecycle transition: go in to the Vault Settings and add the name of the job (PublishPdfAndUploadToFlc) to the transition. Next time a file runs through this transition, the job will be queued.

There are two little things that you have now to configure: the name of your Fusion Lifecycle tenant, and the workspace in which you like to create the items and upload the PDF.

  1. Configure the FL tenant: in the folder C:\ProgramData\coolOrange\powerGateServer\Plugins\fusionLifecycle you’ll find the file fusionLifecycle.dll.config. Open it with a text editor. At the very end, you’ll find the entry <add key=”FlcTenant” value=”coolorange”/>. Change the valueto the name of your tenant, save the file and restart the powerGate server.
  2. Configure the workspace you like to use: open the powerJobs job located under C:\ProgramData\coolOrange\powerJobs\Jobs with an editor (i.e. the PowerShell ISE). At the top, you’ll find the variable $powerGateServerwhich is the computer name of your powerGate Server. If all is installed locally, then localhostwill do.
    Then you’ll find a variable called $WorkspaceId. Set the workspace ID of your choice.

Now it’s time to try it out. Go in Vault, change the state of an Inventor drawing, let powerJobs run, and see whether you have the item and PDF in Fusion Lifecycle.

This is just the beginning. We will provide more stuff, like interacting with Vault events, or integrate with Data Standard, in the next weeks. So, have fun and stay tuned!


Posted in Forge, Fusion Lifecycle, powerJobs, Vault-ERP connection | Leave a comment